Plugin Development Guide
Notice
The API is only available in Vue Devtools 6+
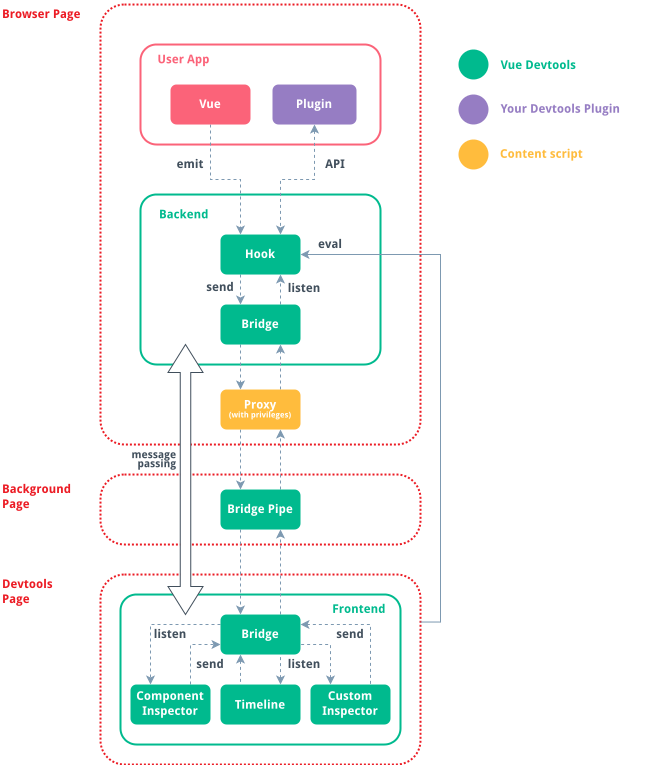
Architecture
A Vue Devtools Plugin is registered from your Vue package code in the user app. It interacts with the Vue Devtools Backend, via the public API. The Backend is a script injected to the web page when Vue Devtools are opened by the user - it handles registering Vue applications and communicating with the Vue Devtools Frontend. The Frontend is the Vue application displayed in the browser devtools pane. The Hook is a global variable added to the page so that the Vue application and your plugin can send messages to the Backend.
There are 3 main API categories:
- Components Inspector: your plugin can add more information to the component tree and state.
- Custom Inspectors: you can add new inspectors to display any kind of state. For example: routes, store current state...
- Timeline: you can add custom layers and send events.
Using the API, you can show information to the user and improve the app debugging experience. Official libraries like vue-router and vuex already use this API!
Architecture schema
Examples
Setup
In your package, install @vue/devtools-api as a dependency:
yarn add @vue/devtools-api
This package will let you register a new Vue Devtools Plugin from your code and comes with full TypeScript typings.
Your package.json file should look similar to this:
{
  "name": "my-awesome-plugin",
  "version": "0.0.0",
  "main": "dist/index.js",
  "dependencies": {
    "@vue/devtools-api": "^6.0.0-beta.14"
  },
  "peerDependencies": {
    "vue": "^3.1.0"
  },
  "devDependencies": {
    "vue": "^3.1.0"
  }
}
It's a good idea to also specify vue as a peer dependency to inform the user which version of Vue your package is compatible with.
TypeScript
If you are using TS, your package.json file should look similar to this:
{
  "name": "my-awesome-plugin",
  "version": "0.0.0",
  "main": "dist/index.js",
  "scripts": {
    "dev": "tsc --watch -d",
    "build": "tsc -d"
  },
  "dependencies": {
    "@vue/devtools-api": "^6.0.0-beta.14"
  },
  "peerDependencies": {
    "vue": "^3.1.0"
  },
  "devDependencies": {
    "@types/node": "^14.14.22",
    "typescript": "^4.1.3",
    "vue": "^3.1.0"
  }
}
Here is an example tsconfig.json file to put next to the package.json file:
{
  "include": [
    "src/global.d.ts",
    "src/**/*.ts",
    "__tests__/**/*.ts"
  ],
  "compilerOptions": {
    "outDir": "dist",
    "sourceMap": false,

    "target": "esnext",
    "module": "esnext",
    "moduleResolution": "node",
    "allowJs": false,
    "skipLibCheck": true,

    "noUnusedLocals": true,
    "strictNullChecks": true,
    "noImplicitAny": true,
    "noImplicitThis": true,
    "noImplicitReturns": false,
    "strict": true,
    "isolatedModules": true,

    "experimentalDecorators": true,
    "resolveJsonModule": true,
    "esModuleInterop": true,
    "removeComments": false,
    "jsx": "preserve",
    "lib": [
      "esnext",
      "dom"
    ],
    "types": [
      "node"
    ]
  }
}
Rollup
Rollup is a general-purpose bundler. You can use it to compile your package for easier consumption. It's also very handy if you have .vue files to compile!
yarn add -D rollup rollup-plugin-vue @rollup/plugin-commonjs @rollup/plugin-node-resolve @rollup/plugin-replace rollup-plugin-terser pascalcase rimraf
Notice about the packages
rollup-plugin-vuecompiles the.vuefiles.@rollup/plugin-commonjsconverts CommonJS modules to ES2015 modules.@rollup/plugin-node-resolvelocates and bundles third-party dependencies innode_modules.@rollup/plugin-replaceallow us to replace some source code text likeprocess.with the values we want at build time.env.NODE_ENV rollup-plugin-terserminimizes the output for production.pascalcaseis used to convert your package name (frompackage.json) into Pascal case, for examplemy-plugintoMyPlugin.rimrafis useful to clear thedistfolder before building.
Rollup config
Create a rollup.config.js file next to the package.json file:
Rollup package
Add the main fields, exports and scripts to your package.json:
{
  "name": "my-plugin",
  "version": "0.0.0",
  "description": "A demo Vue 3 plugin with devtools integration",
  "author": {
    "name": "Guillaume Chau",
    "email": "guillaume.b.chau@gmail.com"
  },
  "main": "dist/my-plugin.cjs.js",
  "module": "dist/my-plugin.esm-bundler.js",
  "unpkg": "dist/my-plugin.global.js",
  "jsdelivr": "dist/my-plugin.global.js",
  "exports": {
    ".": {
      "require": "./dist/my-plugin.cjs.js",
      "browser": "./dist/my-plugin.esm-browser.js",
      "import": "./dist/my-plugin.esm-bundler.js",
      "module": "./dist/my-plugin.esm-bundler.js"
    },
    "./package.json": "./package.json"
  },
  "sideEffects": false,
  "scripts": {
    "build": "rimraf dist && rollup -c rollup.config.js"
  }
  ...
}
Don't forget to replace my-plugin with your package name.
You can now use the build script to compile the package:
yarn build
Rollup with TypeScript
Install the Rollup TS plugin:
yarn add -D rollup-plugin-typescript2
Modify the Rollup config to compile the TS files:
And add the types field to your package.json file:
{
  "name": "my-plugin",
  "version": "0.0.0",
  "description": "A demo Vue 3 plugin with devtools integration",
  "author": {
    "name": "Guillaume Chau",
    "email": "guillaume.b.chau@gmail.com"
  },
  "main": "dist/my-plugin.cjs.js",
  "module": "dist/my-plugin.esm-bundler.js",
  "unpkg": "dist/my-plugin.global.js",
  "jsdelivr": "dist/my-plugin.global.js",
  "types": "dist/index.d.ts",
  "exports": {
    ".": {
      "require": "./dist/my-plugin.cjs.js",
      "browser": "./dist/my-plugin.esm-browser.js",
      "import": "./dist/my-plugin.esm-bundler.js",
      "module": "./dist/my-plugin.esm-bundler.js"
    },
    "./package.json": "./package.json"
  },
  "sideEffects": false,
  "scripts": {
    "build": "rimraf dist && rollup -c rollup.config.js"
  }
  ...
}
See TypeScript for a tsconfig.json example.
Registering your plugin
Create a new devtools.js file in your source folder.
Plugin setup
We are going to import setupDevtoolsPlugin from the @vue/devtools-api package:
import { setupDevtoolsPlugin } from '@vue/devtools-api'
Then we export a function to setup our Vue Devtools plugin:
export function setupDevtools () {
  setupDevtoolsPlugin({ /* Options... */}, api => {
    // Logic...
  })
}
Add the plugin options in the first argument:
setupDevtoolsPlugin({
  id: 'my-awesome-devtools-plugin',
  label: 'My Awesome Plugin',
  packageName: 'my-awesome-plugin',
  homepage: 'https://vuejs.org'
}, api => {
  // Logic...
})
Every plugin is bound to a Vue application. You need to pass the user application to setupDevtoolsPlugin - the same that your plugin install method gets as the first argument.
export function setupDevtools (app) {
  setupDevtoolsPlugin({
    id: 'my-awesome-devtools-plugin',
    label: 'My Awesome Plugin',
    packageName: 'my-awesome-plugin',
    homepage: 'https://vuejs.org',
    app
  }, api => {
    // Logic...
  })
}
The second argument of setupDevtoolsPlugin is a callback which will get the Vue Devtools API as the first argument:
export function setupDevtools (app) {
  setupDevtoolsPlugin({
    id: 'my-awesome-devtools-plugin',
    // ...
  }, api => {
    // Use the API here...
  })
}
We can now import and use our setupDevtools function in our Vue plugin:
import { setupDevtools } from './devtools'

export default {
  install (app, options = {}) {
    // Our Vue plugin logic

    setupDevtools(app)
  }
}
Vue 2
In a Vue 2 app, you need to pass the root component instance as the app parameter:
import { setupDevtools } from './devtools'

export default {
  install (Vue) {
    Vue.mixin({
      beforeCreate () {
        if (this.$options.myPlugin) {
          setupDevtools(this)
        }
      }
    })
  }
}
In the user's app:
import Vue from 'vue'
import App from './App.vue'
import DevtoolsPlugin from './DevtoolsPlugin'

Vue.use(DevtoolsPlugin)

new Vue({
  render: h => h(App),
  myPlugin: true,
}).$mount('#app')
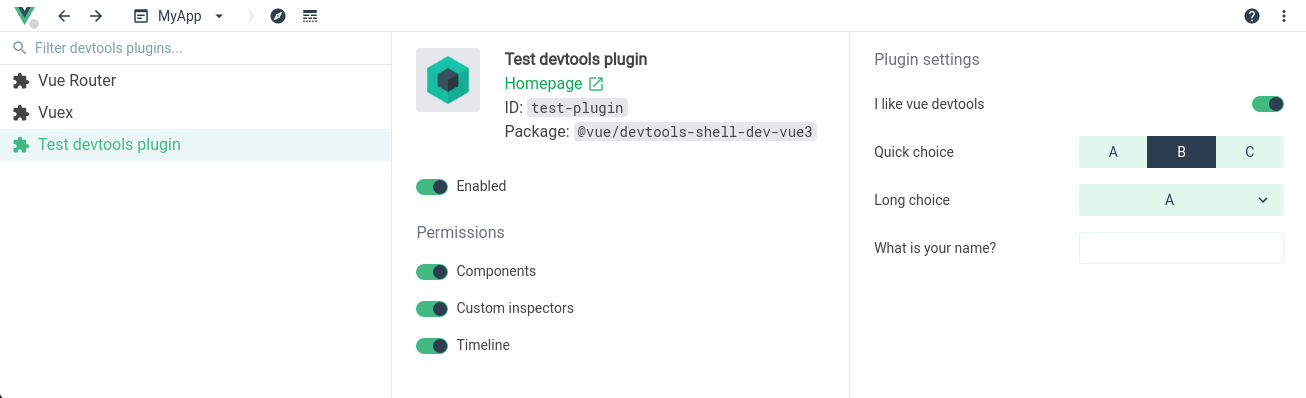
Plugin settings
With the settings option, your plugin can expose some settings to the user. This can be very useful to allow some customization!
All settings items must have the following properties:
type(see below)label: a string to describe the settings itemdefaultValue
Available settings types:
booleantextchoiceoptions: list of objects with type{ value: any, label: string }component: (optional) can be either'select'(default) or'button-group'
Example:
setupDevtoolsPlugin({
  id: 'my-awesome-devtools-plugin',
  settings: {
    test1: {
      label: 'I like vue devtools',
      type: 'boolean',
      defaultValue: true
    },
    test2: {
      label: 'Quick choice',
      type: 'choice',
      defaultValue: 'a',
      options: [
        { value: 'a', label: 'A' },
        { value: 'b', label: 'B' },
        { value: 'c', label: 'C' }
      ],
      component: 'button-group'
    },
    test3: {
      label: 'Long choice',
      type: 'choice',
      defaultValue: 'a',
      options: [
        { value: 'a', label: 'A' },
        { value: 'b', label: 'B' },
        { value: 'c', label: 'C' },
        { value: 'd', label: 'D' },
        { value: 'e', label: 'E' }
      ]
    },
    test4: {
      label: 'What is your name?',
      type: 'text',
      defaultValue: ''
    }
  },
}, api => {
  // Use `api.getSettings()` to get the current settings for the plugin
  console.log(api.getSettings())
})
You can listen for changes made to the settings by the user with the api.on.setPluginSettings hook:
api.on.setPluginSettings(payload => {
  // Do something...
})
Tree-shaking for production
As we are going to write code only for integrating for the Vue Devtools, it would be a good idea to strip it for the production versions of our package - thus improving size and performance.
By default, Vue 3 doesn't include the devtools-related code in production. It uses the _ environment variable as a compile flag to force enable this code. We can use the same one for the same purpose, and we can also check for NODE_ENV to automatically include the devtools plugin in development.
if (process.env.NODE_ENV === 'development' || __VUE_PROD_DEVTOOLS__) {
  setupDevtools(app)
}
In your build setup you should replace process. and _ for the builds of your library that don't target bundlers. See Rollup setup that includes an example usage of @rollup/plugin-replace.
Components
The Components API allows you to:
- Add tags to the components tree.
- Display additional data in the component state inspector.
Hooks
The Vue Devtools API includes Hooks which are available via api.on. Hooks are useful to add new debugging information to existing elements, such as components tree nodes, component state, timeline events... A new callback for a specific hook can be registered with api.on.hookName(callback).
Every hook expects the callback function to have those same arguments:
payloadwhich holds the state related to the hook. It can be modified to pass back additional information.contextexposing data about the devtools
Example:
export function setupDevtools (app) {
  setupDevtoolsPlugin({
    id: 'my-awesome-devtools-plugin',
    // ...
  }, api => {
    api.on.hookNameHere((payload, context) => {
      // Do something...
    })
  })
}
Every hook handle asynchronous callbacks:
export function setupDevtools (app) {
  setupDevtoolsPlugin({
    id: 'my-awesome-devtools-plugin',
    // ...
  }, api => {
    api.on.hookNameHere(async (payload, context) => {
      await something()
    })
  })
}
All the registered callbacks will be called sequentially including the asynchronous ones, in the order they were registered on the page.
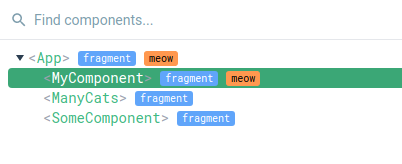
Components tree
To add tags to the components tree, we can use the visitComponentTree hook:
export function setupDevtools (app) {
  setupDevtoolsPlugin({
    id: 'my-awesome-devtools-plugin',
    // ...
  }, api => {
    api.on.visitComponentTree((payload, context) => {
      const node = payload.treeNode
      if (payload.componentInstance.type.meow) {
        node.tags.push({
          label: 'meow',
          textColor: 0x000000,
          backgroundColor: 0xff984f
        })
      }
    })
  })
}
This example will add a meow tag to any component that add the meow: true option to its definition:
export default {
  meow: true
}
Here is an example result:
Colors
Colors in the Vue Devtools API are encoded as numbers instead of strings. You can use 0x in JavaScript to write an hexadecimal value:
0x000000 // black
0xffffff // white
0xff984f // orange
0x41b86a // green
Example:
api.on.visitComponentTree((payload, context) => {
  const node = payload.treeNode
  if (payload.componentInstance.type.meow) {
    node.tags.push({
      label: 'meow',
      textColor: 0x000000,
      backgroundColor: 0xff984f
    })
  }
})
Notify a change
By default the Vue Devtools will determine when to update the components tree (and thus calling the hook again). We can force a refresh with the api.notifyComponentUpdate function:
api.notifyComponentUpdate(componentInstance)
That way, if we know that the tags of a specific component should be changed, we can notify the Vue Devtools and then our hook callback will be called again.
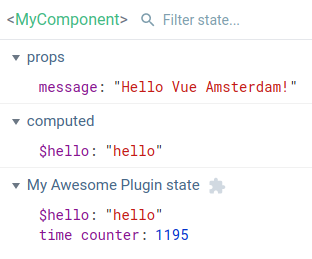
Component state
Adding new data to the component state inspector can be achieved with the inspectComponent hook:
api.on.inspectComponent((payload, context) => {
  // ...
})
Each new field should be added to the payload.instanceData.state array:
api.on.inspectComponent((payload, context) => {
  payload.instanceData.state.push({
    type: 'My Awesome Plugin state',
    key: '$hello',
    value: data.message
  })

  payload.instanceData.state.push({
    type: 'My Awesome Plugin state',
    key: 'time counter',
    value: data.counter
  })
})
Notice how we are passing some data to the Vue Devtools plugin from our library with the data argument of setupDevtools (see below).
The type will be used to create a new section in the state inspector. It is recommended to use a variable:
const stateType = 'My Awesome Plugin state'

export function setupDevtools (app, data) {
  setupDevtoolsPlugin({
    id: 'my-awesome-devtools-plugin',
    // ...
  }, api => {
    api.on.inspectComponent((payload, context) => {
      payload.instanceData.state.push({
        type: stateType,
        key: '$hello',
        value: data.message
      })

      payload.instanceData.state.push({
        type: stateType,
        key: 'time counter',
        value: data.counter
      })
    })
  })
}
Then, use this variable to declare your data type in the Vue Devtools plugin options using componentStateTypes:
export function setupDevtools (app) {
  setupDevtoolsPlugin({
    id: 'my-awesome-devtools-plugin',
    label: 'My Awesome Plugin',
    packageName: 'my-awesome-plugin',
    homepage: 'https://vuejs.org',
    componentStateTypes: [
      stateType
    ],
    app
  }, api => {
    // ...
  })
}
Here is an example result:
You can again use notifyComponentUpdate to force a state refresh of the current component if you don't pass any argument:
api.notifyComponentUpdate()
Editing component state
You can mark some of your state fields as editable to allow editing by the user:
payload.instanceData.state.push({
  type: stateType,
  key: '$hello',
  value: data.message,
  editable: true
})
You can then handle the edition submit with the editComponentState hook:
api.on.editComponentState(payload => {
  // ...
})
Then, you have to check if the field being edited is coming from your plugin with payload.type:
api.on.editComponentState(payload => {
  if (payload.type === stateType) {
    // ...
  }
})
This way we don't do anything if the user is editing something else (like data properties).
An edited field can be modified in the following ways:
- assigning a new value,
- adding a new property (object) or item (array),
- removing a property or item.
You can then use the payload.set helper function to apply the edition. The argument to payload.set should be the object holding our editable state:
api.on.editComponentState(payload => {
  if (payload.type === stateType) {
    payload.set(data)
  }
})
In this example, we execute payload.set(data) because we are sending the data.message editable state:
payload.instanceData.state.push({
  type: stateType,
  key: '$hello',
  value: data.message,
  editable: true
})
You can also use a separate object to hold your editable state (example).
Custom inspector
The Vue Devtools only have one inspector by default: the Components inspector. Vue Devtools plugins can introduce new inspectors alongside it to display more debugging information.
To setup a custom inspector, your plugin must:
- Register the custom inspector with
addInspector. - Handle the
getInspectorTreehook to populate the inspector tree (on the left or top of the devtools). - Handle the
getInspectorStatehook to send state (on the right or bottom of the devtools).
Register the custom inspector
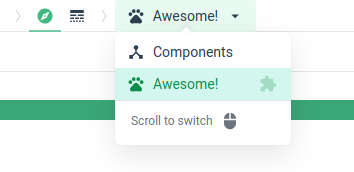
Let's start by regiustering our custom inspector with addInspector:
api.addInspector({
  id: 'my-awesome-plugin',
  label: 'Awesome!',
  icon: 'pets',
})
It is recommended to use a variable to store the inspector id as it will be needed in the hooks later:
const inspectorId = 'my-awesome-plugin'

export function setupDevtools (app, data) {
  setupDevtoolsPlugin({
    id: 'my-awesome-devtools-plugin',
    // ...
  }, api => {
    api.addInspector({
      id: inspectorId,
      label: 'Awesome!',
      icon: 'pets',
    })
  })
}
You can use any Material Icon code for the icon, for example note_add or drag_indicator.
Here is an example result:
Send inspector tree
With the getInspectorTree, we can display a tree of nodes in our inspector:
api.on.getInspectorTree((payload, context) => {
  // ...
})
But before that, we need to check if hook is called for the correct inspector (ours):
api.on.getInspectorTree((payload, context) => {
  if (payload.inspectorId === inspectorId) {
    // ...
  }
})
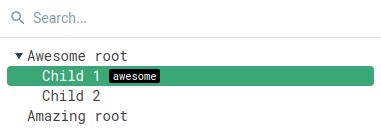
We can then put the nodes tree into payload.rootNodes:
api.on.getInspectorTree((payload, context) => {
  if (payload.inspectorId === inspectorId) {
    payload.rootNodes = [
      {
        id: 'root',
        label: 'Awesome root',
        children: [
          {
            id: 'child-1',
            label: 'Child 1',
            tags: [
              {
                label: 'awesome',
                textColor: 0xffffff,
                backgroundColor: 0x000000
              }
            ]
          },
          {
            id: 'child-2',
            label: 'Child 2'
          }
        ]
      },
      {
        id: 'root2',
        label: 'Amazing root'
      }
    ]
  }
})
Here is an example result:
Send the inspector state
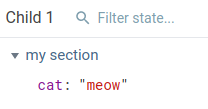
Use the getInspectorState hook to send the state depending on the selected node (check payload.nodeId):
api.on.getInspectorState((payload, context) => {
  if (payload.inspectorId === inspectorId) {
    if (payload.nodeId === 'child-1') {
      payload.state = {
        'my section': [
          {
            key: 'cat',
            value: 'meow',
          }
        ]
      }
    } else if (payload.nodeId === 'child-2') {
      payload.state = {
        'my section': [
          {
            key: 'dog',
            value: 'waf',
          }
        ]
      }
    }
  }
})
Don't forget to check if the inspector is the right one with payload.inspectorId!
Here is an example result when selecting "Child 1":
Refresh the inspector
The Vue Devtools will not automatically refresh your custom inspector. To send updates, you have two different available functions:
sendInspectorTreeto refresh the nodes tree,sendInspectorStateto refersh the state inspector.
Example:
// Update tree
api.sendInspectorTree(inspectorId)

// Update state
api.sendInspectorState(inspectorId)
Calling those functions will call the getInspectorTree and getInspectorState hooks respectively.
Timeline
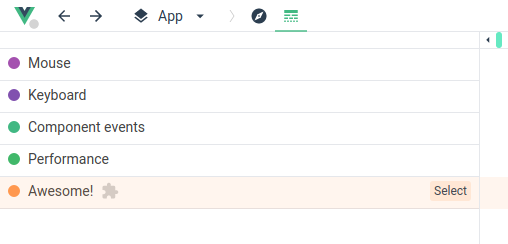
The Vue Devtools comes with a few built-in layers on the Timeline, such as the Mouse & Keyboard events, the Component events and the Performance flamechart. You can add custom Timeline layers with the following steps:
- Register the layer with
addTimelineLayer. - Send events with
addTimelineEvent.
Register a layer
Use the addTimelineLayer function to register your custom Timeline layer:
const timelineLayerId = 'my-awesome-plugin'

export function setupDevtools (app, data) {
  setupDevtoolsPlugin({
    id: 'my-awesome-devtools-plugin',
    // ...
  }, api => {
    api.addTimelineLayer({
      id: timelineLayerId,
      color: 0xff984f,
      label: 'Awesome!'
    })
  })
}
Here is an example result:
Send an event
Adding new events is done with the addTimelineEvent function:
window.addEventListener('click', event => {
  api.addTimelineEvent({
    layerId: timelineLayerId,
    event: {
      time: api.now(),
      data: {
        mouseX: event.clientX,
        mouseY: event.clientY
      }
    }
  })
})
You can set the enableEarlyProxy plugin option to true to be able to send timeline events before the Vue devtools are opened and connected:
setupDevtoolsPlugin({
  id: 'my-awesome-devtools-plugin',
  app,
  enableEarlyProxy: true
}, api => {
  // `api` will be a proxy waiting for the real API to be available
})
Event group
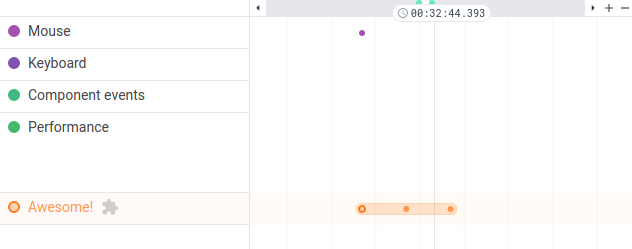
You can group events together. It will display them inside a pill-shaped rectangle, and will display the total duration of the group in the event inspector.
Set the groupId option on the event with an identical value to create a group. Here is an example of a group with 3 events:
const groupId = 'group-1'

devtoolsApi.addTimelineEvent({
  layerId: timelineLayerId,
  event: {
    time: api.now(),
    data: {
      label: 'group test'
    },
    title: 'group test',
    groupId
  }
})

devtoolsApi.addTimelineEvent({
  layerId: timelineLayerId,
  event: {
    time: api.now() + 10,
    data: {
      label: 'group test (event 2)',
    },
    title: 'group test',
    groupId
  }
})

devtoolsApi.addTimelineEvent({
  layerId: timelineLayerId,
  event: {
    time: api.now() + 20,
    data: {
      label: 'group test (event 3)',
    },
    title: 'group test',
    groupId
  }
})
Here is the result on the timeline with the first event of the group selected:
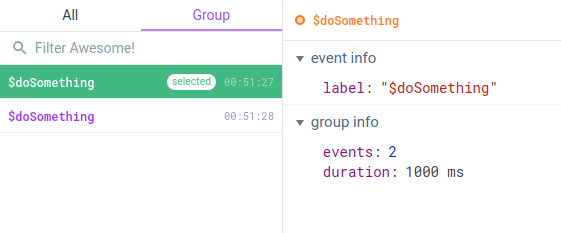
And the event inspector view with the "Group" tab:

Notice the "group info" section with additional information about the group.
Events from the package
Let's use the addTimelineEvent API to track an asynchronous method expose by our Vue plugin. We will call it $doSomething:
import { setupDevtools } from './devtools'

export default {
  install (app, options = {}) {
    app.mixin({
      methods: {
        $doSomething () {
          return new Promise(resolve => {
            setTimeout(() => {
              resolve('done')
            }, 1000)
          })
        }
      }
    })

    if (process.env.NODE_ENV === 'development' || __VUE_PROD_DEVTOOLS__) {
      setupDevtools(app, data)
    }
  }
}
We can now call this method from any component in the user application:
this.$doSomething()
We would like to track this method from our library code, so we need to return a set of helper functions from our setupDevtools function. The devtoolsApi variable will hold the Vue Devtools API and the devtools variable will be an object with helper functions, which we will return:
export function setupDevtools (app, data) {
  let devtoolsApi

  const devtools = {
    // Our helpers here
  }

  setupDevtoolsPlugin({
    id: 'my-awesome-devtools-plugin',
    // ...
  }, api => {
    devtoolsApi = api

    // ...
  })

  return devtools
}
Back in our library code, we can create a devtools variable to retrieve the result of setupDevtools, i.e. the object that will contain our helper functions:
import { setupDevtools } from './devtools'

export default {
  install (app, options = {}) {
    let devtools

    app.mixin({
      // ...
    })

    if (process.env.NODE_ENV === 'development' || __VUE_PROD_DEVTOOLS__) {
      devtools = setupDevtools(app)
    }
  }
}
Let's implement a trackStart helper function to create one event when we want to start tracking a call, and another event when the call is finished:
export function setupDevtools (app, data) {
  let devtoolsApi
  let trackId = 0

  const devtools = {
    trackStart: (label: string) => {
      const groupId = 'track' + trackId++

      // Start
      devtoolsApi.addTimelineEvent({
        layerId: timelineLayerId,
        event: {
          time: api.now(),
          data: {
            label
          },
          title: label,
          groupId
        }
      })

      return () => {
        // End
        devtoolsApi.addTimelineEvent({
          layerId: timelineLayerId,
          event: {
            time: api.now(),
            data: {
              label,
              done: true
            },
            title: label,
            groupId
          }
        })
      }
    }
  }

  setupDevtoolsPlugin({
    id: 'my-awesome-devtools-plugin',
    // ...
  }, api => {
    devtoolsApi = api

    // ...
  })

  return devtools
}
The trackId is used to generate a unique group ID for each time we are going to call startTrack. By using the same ID, we will create a group with the two events, even if they are not both created at the same time.
We can use this trackStart helper function like this:
const trackEnd = devtools.trackStart('some-label')
// Later
trackEnd()
We can now use this trackStart function in our library code:
let devtools

app.mixin({
  methods: {
    $doSomething () {
      const trackEnd = devtools ? devtools.trackStart('$doSomething') : null
      return new Promise(resolve => {
        setTimeout(() => {
          if (trackEnd) trackEnd()
          resolve('done')
        }, 1000)
      })
    }
  }
})

if (process.env.NODE_ENV === 'development' || __VUE_PROD_DEVTOOLS__) {
  devtools = setupDevtools(app, data)
}
WARNING
We must be careful of checking if our devtools variable is defined, because we strip the devtools code out in production! See Tree-shaking for production.
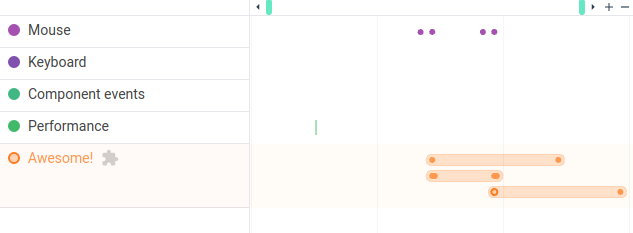
Here is an example result:
And the event inspector:
Thank you for following the Vue Devtools Plugin development guide! You can find more detailed descriptions of the API in the API Reference. Happy building! 😸